Introduction
I am very passionate about music.
I believe it is one of the most personal things that we have. Each one of us develops an intimate and unique relationship with it. Regardless of the artists or style you like and/or follow, music can be your dearest accompaniment for life.
As an amateur classical pianist, I've developed a relationship that not only involves appreciating music, but also creating it. From the structured composition style of Beethoven to the chaotic and rhythmically convoluted works of Rachmaninoff, every piece, note, or passage has told me something unique.
Recently at ITP, I've realized that music is defined by the interface we use to create it. Music for piano sounds the way it does because of the limitations of a mechanical instrument like it, and the same applies to every other instrument.
Based on these principles, I am developing a musical instrument that leverages the MIDI protocol to make simple, rich and expressive sounds.
Disclaimer: I am trying a new thing where I write a blog post as I develop a concept, instead of writing at the end when having the finished thing. Due to this, a messy and much more verbose story is told here. Something that I intended to make at the beginning might not be included in the final result. Consequently, all of the process is included here and it follows a narrative that expresses my exact process.
Concept
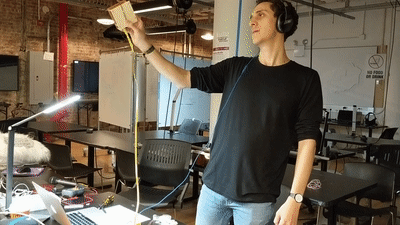
The idea is very simple: Create a musical instrument that works with your hand's movements in space.
This instrument sits in the palm of your hand and by performing very natural gestures, sound is produced. Ideally, the instrument would work wirelessly (I really hope i can get this done in time).
The instrument will provide users control over 4 main things in a monophonic synthesizer:
1. Note on/off
2. Pitch
3. Volume
4. Tremolo
5. Maybe cut-off frequency of a filter
Note on/off
Triggering and silencing notes is done by simply performing a squeezing gesture with your hand.
I want to test two approaches here:
Binary on/off
Users can only start or stop a note with the squeeze gesture. Volume control is leveraged to another gesture.
Analog on/off
Users can not only squeeze and release to trigger or stop a note, but the strength of the gesture is mapped to the note's volume
Pitch
The pitch will run on a scale (not sure if chromatic or something else) and ideally in two octaves.
Pitch is selected by performing a wrist rotation on the X axis. Being able to mentally map notes in the air can get confusing, so when the corresponding angle (in regards to the X axis rotation) for any given note is reached, a subtle haptic vibration will inform the user.
Volume
If I decide to take the Binary on/off approach for Notes, then wrist rotation on the Y axis will be mapped to volume. If the analogue route is taken, the volume would be mapped to the intensity of the pressure sensor.
Tremolo
In my opinion, tremolos on oscillator's pitches give a nice and thought-inducing effect. So, wrist rotation on the Z axis will be mapped to tremolo intensity or speed (need to test in order to decide).
Cut-off (maybe)
I am open to adding another parameter instead of tremolo. Testing will determine this. If I end up leveraging volume to the pressure sensor, I will assign cut-off to the remaining axis in space.
Process

In order to stay on track, I passed all of the tasks I needed to complete to a Trello board.
Once I had a complete grasp of the project size, I decided to start with MIDI and mock inputs.
Aside from the cpu, the three main components of the instrument are: the on/off sensor, the haptic feedback motor and the orientation sensor.
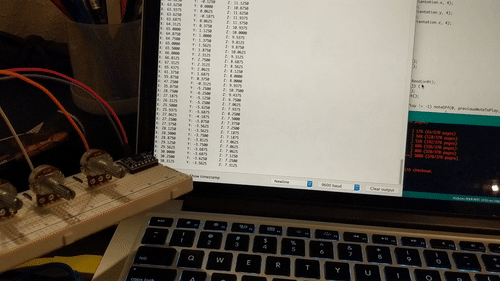
Since I'm expecting the orientation sensor to give me a 3-point coordinate (Euler vector), it makes sense to simulate those inputs with a set of potentiometers. That way, I can focus on processing the inputs as the equivalent MIDI commands, and plugging the orientation sensor afterwards – I looked at the sensor's docs before making this assumption.
Simulating sensor readings
In order to simulate the sensor inputs that I'll eventually get from the BNO055 absolute orientation sensor, I plugged in 3 pots. Each one of these pots map to a X-Y-Z coordinate, eventually getting translated into a MIDI command/value.
I broke that task down into simple and incremental tests. I tackled one by one in the following order:
1. Extracting a note from a given scale by adjusting the potentiometer
2. Sending that note over MIDI every X milliseconds
3. Adding a pushbutton to trigger notes on and off every X milliseconds.
4. Select the notes to be played using the pot and pushbutton
5. Play as long as the pushbutton is pressed
This one made me realize that simply playing note-to-note and relying on glide or portamento time to bend the pitches for me gives a "stepped" transition between notes. Definitely have to add pitch bending, but MAYBE not, if the instrument allows it.
6. Adjusting velocity with pot #2.
7. Adjusting the volume while playing a note
I learned that changing the velocity of a note while its being played is not possible. Some controllers have 'after-touch', but a simpler solution was to send a unassigned Control Change MIDI message (14) to change the channels volume, and the noteOn velocity is always 127 (the loudest possible).
8. Assign the third pot to an instrument effect
Used the low-pass filter cut-off frequency during the testing phase. It sounds pretty good.
Once all the simulation tests were finished and the instrument made some descent noises, it became time to start testing the actual interaction.
Interaction development
As stated before, the instruments interaction is composed by three main components:
1. Wrist rotation in the X-Y-Z axis.
2. Haptic feedback to the user.
3. On/off gesture.
Wrist rotation in X-Y-Z
First, hooked up the BNO055 to the Arduino board.
Tip #1: To properly include the sensors library, be sure to download the Adafruit BNO055 Sensor Library **and** Adafruit Unified Sensor Library.
Tip #2: (This one comes from Tim, a friend from ITP): If you are using the BNO055 from Tinkershpere (a store in NYC), change the I2C address on the object declaration, like so:
Adafruit_BNO055 bno = Adafruit_BNO055(55,0x29);
After plugging in and initializing the sensor, I took a dive into the results it gives.
The sensor data looks pretty accurate. The only issue I seem to be having is that the Y rotation values go from -90 to 90 two times, instead of -180 to 180. I did many experiments with different lower level APIs but it seems that my sensor is defective, or more possibly there is something about Euler's vectors I don't fully understand. Anyway, it's not a big deal since im not planning on doing full 360 rotations, but this needs further research.
The sensor is nice, but I need a way of calibrating the readings so that the users can set any position as home...
Angle ranges
The sensor seems to be giving me the following ranges for each axis:
X axis
0 - 360
Y axis
-90 to 90
Z axis
-180 to 180
I tied the BNO's data to a corresponding pot equivalent. Each value had to be mapped to their specific range, but once that was done, it was quite simple to let go of the pots altogether.
Haptic Feedback
It's time to let the user now that they are in a right spot in space.
My idea here is to perform a short vibration each time a change in pitch is achieved (only for X axis movements).
First, I need to make sure that I can talk to the DRV2605L without any other components of the instrument.

Once that worked, I integrated the haptic feedback into the instrument sketch. After a few tests, everything seems to be working properly, meaning I can communicate with the DRV and the BNO at the same time with a single I2C bus.
Perfecting the feedback intensity
I want the user to receive the right amount of feedback.
I looked at the driver's datasheet and tested a few of the STRONG_CLICK commands. Preliminarily, it seems like "Strong Click - 100% (01)" is right way to go.
I tested this command's haptic feeling on the breadboard, but I'm aware that once everything goes in the enclosure, some adjustments are going to have to be made.
Once that the sensor and haptic feedback motor were working, I passed everything to a perfboard. It made sense to do this before adding the on/off sensor since it is going to be mounted on a different surface.
On/Off Sensor
So far, I tested everything relying on a temporal push button.
I tested some preliminary sounds/interaction combos and I feel like volume should not be assigned to an axis in space.
Ideally, squeezing force should be the control for volume. So lets add that.
Hooking up the FSR by itself
Up until this point, I've never used an FSR. I know that they are pretty straight forward, but I hooked up one and created a stand alone sketch to understand its behavior.
After that worked properly, I refactored the code to adjust volume according to FSR pressure and added a second effect to the Y axis.
Sound Design
After setting the components together, I dove deep into the sound design part of it.
I created a synth that I like but after a couple of hours of choosing the right parameters, I decided to leave it as is and focus on finishing the controller first.
I ended up making my own synthesizer with four oscillators and a few effects,

Finishing the controller
Everything worked correctly. The MKR1010 was in place, and so where the other two breakout boards. The only thing missing was to solder and place the FSR in a convenient, ergonomic and cohesive position.
I struggled a lot in this part. I am somewhat new at fabrication, so some tools and techniques are not second nature to me, for now.
The interface I intend to build has a soft and squishy feel to it. I thought about many different materials for this. Memory foam? kids foam? A loofa?
I took a quick trip to K-Mart and sourced what I could find, landing on a dish scrub. Cut down a piece of sponge and placed the FSR inside, then glued that piece of sponge to the perfboard and tested its feeling.
Luckily, I quickly discovered that it was awful!
It became evident that the on/off sensor should be placed on top of the instrument, not on one of its sides.
I sketched a few ideas on paper and decided to add a second floor to the perfboard and place the FSR there. I grabbed some nice wood I had lying around, cut a piece the same size as the perfboard and drilled some screw-holes in both surfaces to connect four standoffs. I had to be extra careful with this part because if the holes between the two floors didn't line up, I'd be in big trouble.
Once the structure was complete, I placed the FSR on the top. I felt like sponge was not really necessary any more, so I had an exposed sensor on a wood surface. Instead of hiding it, I embraced this aesthetic and added a couple of black wires to it.
___
Final Result
The instrument works really nice. No calibration was needed at the end. Users have said that the sound is very immersive and the experience is very intriguing and fun.
I am personally very happy with the end result.
You can watch a video of it down below.
Thanks for reading.