Call it marketing, but we actually love breakfast. Eggs, fruit on the side, and some cereal. There are countless options when you to your favorite grocery store, but this delicious and practical breakfast has a weakness. If left for too long on the bowl, it turns into a messy, disappointing homogenous mushy body, and I don't know about you, but for me, it's all about the crunch.
Gilad Dor and I couldn't agree more on the universal truth that no one likes a mushy cereal.
We studied this phenomenon and came to the conclusion that the right crunch/mush ratio is around 1/4, or 25% mushy. A super crunchy cereal leaves you with a dry mouth, but anything after 25% stops being ideal.
So, we created a Chindogu for it.
A remote-controlled cereal dispenser that gives you just a spoonful of cereal directly into the milk. The remote itself is the spoon.

Process
There are two ways of looking at the mush dilemma. You either limit the time cereal spends in the milk, or you limit the time milk spends on the cereal.


Having an empty bowl with 6 cheerios and a squirt of milk wouldn't please anyone and would do no justice to cereals worldwide, so we knew that we needed to go for an approach that cherished the amazing properties of milk + cereal. For example, when you're eating a mighty bowl, the milk retains all the sugar and debris from all the cereal it encounters. When you're done with the cereal, you can either add more or drink the flavored milk.
We chose to use a bowl of milk and dispense cereal as you needed to keep the nice milk qualities mentioned above.
Dispensing mechanisms
We tried a lot of different dispensing methods. At first, we used a funnel and cheerios and experimented with different cone radiuses. However, we consistently ran into the issue of the cereal getting stuck by itself. When you pour pellets of any material (in this case cheerios) down a funnel, the pellets tend to conglomerate near the opening of the funnel, creating a blockage that is hard to break.
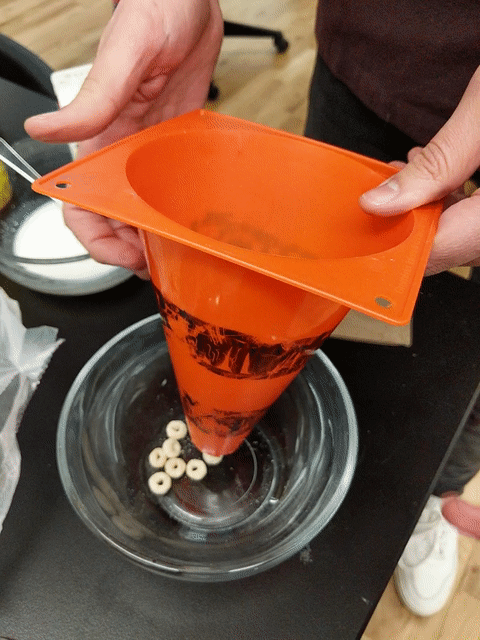


The cereal was getting stuck at the end of the funnel, no matter who hard we tried
Pulling inspiration from different methods of transporting material in factories such as convertor belts and chutes, we tried using a screw feeder mechanism with no luck...
Finally, after countless hours of experimenting, we found that having a square funnel with a shuffling pin was enough.
What does this mean? This is illustrated further below.
Form
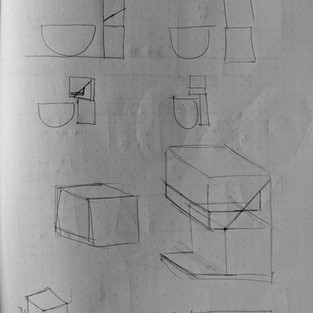
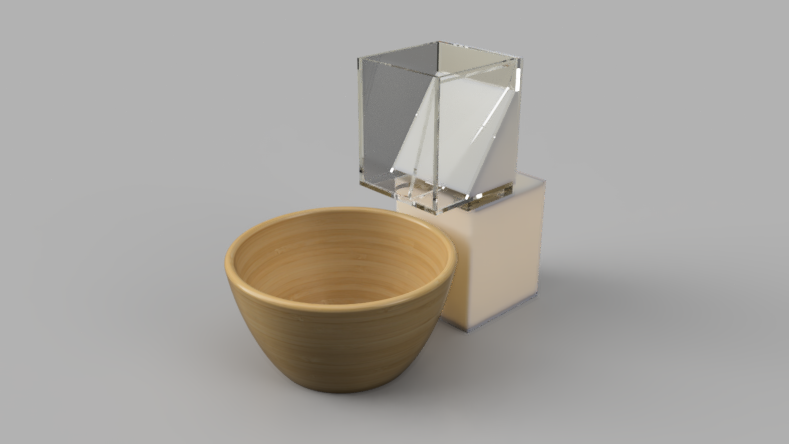
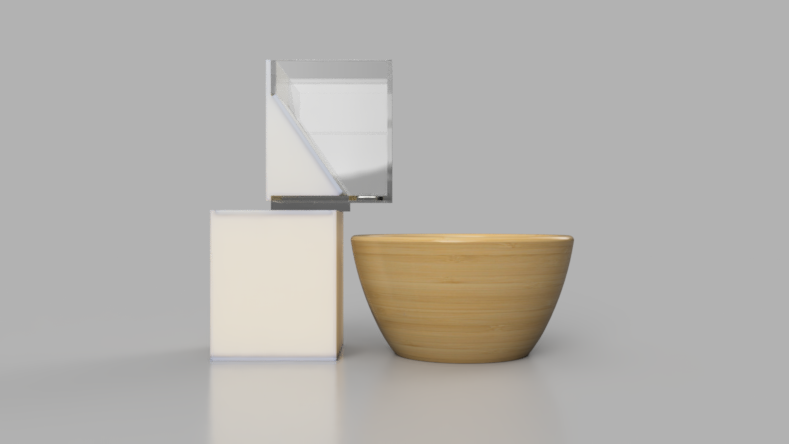
The cereal dispenser needed to blend well in the kitchen. We looked at different organic shapes and materials, such as wood, aluminum, and others, but eventually decided to use white matte and translucid acrylic due to how easy it is to work with.
We also looked at different ways of suspending the dispenser on top of the bowl, and inspired by the form exploration exercises from Giorgia Lupi that Pedro showed in class, a boxy design felt natural.


White and translucid acrylic worked perfectly for our application
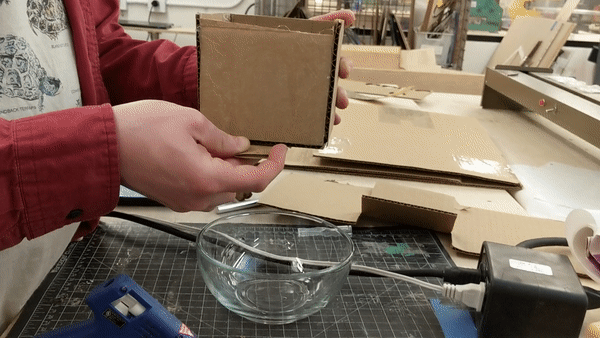
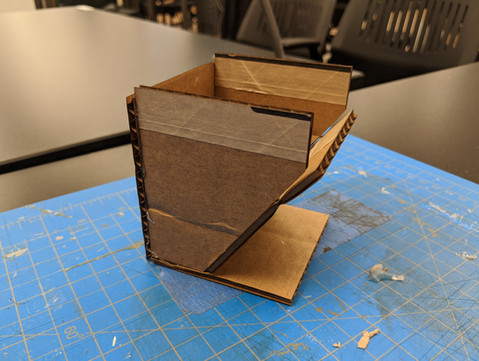
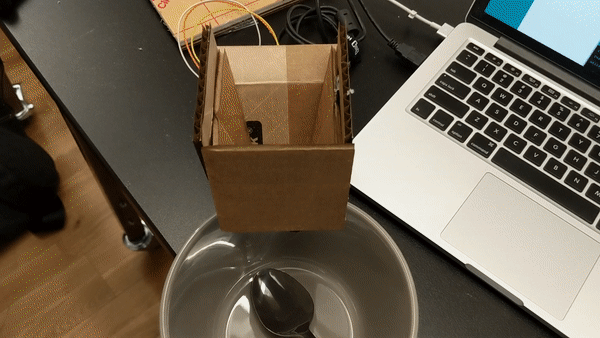
A drawing was made and based on that, we started building and refining with cardboard. Once we arrived at a volume that could house enough cereal and a dispensing mechanism that worked well enough, we translated the design into a Fusion 360 file.


I remember CADing this against the clock because the laser cutters were about to close down, but we were able to do it in around 45 minutes, against all odds.


Mechanism
The dispensing mechanism is quite simple. The cereal funnels down naturally thanks to gravity and a servo opens and closes the gate that limits or allows cereal to fall down into the plate. The gate has an aluminum pin attached to it and it travels up to the cereal. This pin moves with the gate and shuffles the cereal, ensuring that it doesn't get stuck and creating a controlled, subtle, and precise cereal delivery.
Electronics
Since the device is quite small and we didn't want it to be plugged into the wall, we needed to find the right micro-controller that allowed us wireless communication with low power consumption. I have experience with Bluetooth Low Energy, so we naturally chose to use this protocol.
However, we initially spent a good 3 days trying to create this using IR but didn't get very far. The IR libraries were too big for a small microcontroller like the ATTINY85, among other issues.
We developed the first functional prototype using two Arduino Nano BLE 33. One for the device and one for the remote. When putting everything into the device, we realized that our original plan, which was to power the device with a coin-cell battery or a LiPo battery was simply not going to work. The Nano BLE needs at least 4.5V to turn on, and our batteries were rated for 3.7Vnominal.
The initial prototype used microcontrollers that couldn't be powered with a LiPo or Coin-Cell battery. We were relying on those for the final product, so we needed to quickly find another way.
This all happened at 2 am. Thankfully, we found some smaller microcontrollers that could be powered with 3.7V inside the shop. The ReadBear Nano V2 ended up saving the day.


Remote
The remote also contained a RedBear Nano V2 microcontroller. A push-button connected to it and a battery was all we needed. I spent hours struggling with the code, trying to set up the remote as a BLE Central without any success. After finally being able to connect the 2 devices, sending the propper GATT characteristic proved to be incredibly cumbersome. The documentation on the Nano is extremely limited, and no matter what we tried, we simply couldn't make it work.
A late-night pivot to another microcontroller that was smaller but not as documented as the Arduino was a hard challenge to overcome.
Turns out, the u_int8 that is sent needs to be in hex format...
This doesn't work
ble.gattClient().write(GattClient::GATT_OP_WRITE_CMD, 0, 23, 0, (uint8_t *)&value);But, this does
ble.gattClient().write(GattClient::GATT_OP_WRITE_CMD, 0, 0x23, 0, (uint8_t *)&value);These two lines look identical. However, the simple difference in the '23' (0x23) number is what was keeping us from sending the proper command. The first line sends an int, the second one sends a hex. You need to send a hex.


Putting everything together
The whole device was put together with acrylic cement and a lot of care. The spoon case was 3D printed, sanded, and painted to give it the nice baby-blue color it has.
It sits comfortably above the bowl, and it creates a fun and magical breakfast experience like no other.


Final thoughts
I personally had a great time designing and building this. We worked really hard to overcome many obstacles, both technical and conceptual, and were able to materialize a whacky idea in a robust way. Projects that combine mechanical, electrical, and industrial design are the ones that make me the most passionate about, so working on this one felt natural and fun, despite the hard hours and stress.
I know Gilad and I would've loved to take better pictures of the final device, but COVID-19 forced us to leave school the morning after finishing it.
Hopefully, when the time comes, we can do justice to this little guy.


Thanks for reading!